As a former Pre-Kindergarten teacher and now stay-at-home mommy of 2 boys and a sweet baby girl, many people ask me how they can be implementing educational concepts in the lives of their young children at home before they enter school. Instead of trying to come up with a quick list of ideas off the top of my head to answer these questions, I have decided to put all of my lessons into this blog. I, along with so many other parents, want to be purposeful at home with my children and make the most of the time I have with them.
I hope that this blog can help, encourage, and inspire you to work with your kiddos and
get involved in the learning process! The benefits will be endless,
and the moments you share together will be priceless! As Dr. Seuss once said,
"The more that you read, the more things you will know.
The more that you learn, the more places you'll go!"

Tuesday, January 31, 2012

Thinking Theme: Nursery Rhymes

Letter of the Week:  R

Number of the Week:  13

Bible Verse of the Week:  "Rejoice in the Lord always; again I will say, rejoice!" Philippians 4:4

Books:


Songs:
* Jack Hartmann - Rhyming to the Beat - definitely worth a purchase or download!
* Mother Goose Club is a fantastic website with videos of each rhyme that your children can watch and sing along to!

Rhyme Focus:
* Each day we will be focusing on a different nursery rhyme.  I have posters for all of them, but there are nursery rhyme printables from PreKinders and ABC Teach that you can use throughout the week.  It is important to focus on the rhyming words for each specific one. Use crayons or markers to circle each set of rhyming words in a different color. Here is an example:


____________________________
Lesson 1: Humpty Dumpty
Objectives:
* To learn and recite the Humpty Dumpty nursery rhyme
* To recognize the rhyming words in the rhyme
* To understand what happens to an egg when it breaks
* To create a picture of Humpty Dumpty using the fine motor skills of tearing, cutting, gluing, and drawing

Materials:
* white, blue, and red construction paper
* scissors
* glue
* pencil
* googly eyes and crayons if you would like


Procedure:
1. Read the Humpty Dumpty rhyme and circle the rhyming words.

2. Talk about what happens to an egg when it breaks and cracks.  You could even demonstrate with a real egg.  Discuss why the king's horses and king's men could not put him back together.  Ask your child if they think they can put him together again...or at least try!

3. Help your child draw horizontal and vertical lines to represent a brick wall on half of the red construction paper, then cut out the half of the paper.


4. Glue the half sheet onto the bottom half of the blue construction paper.


5. Draw an egg/oval shape with half of it on the blue paper and half on the red paper.
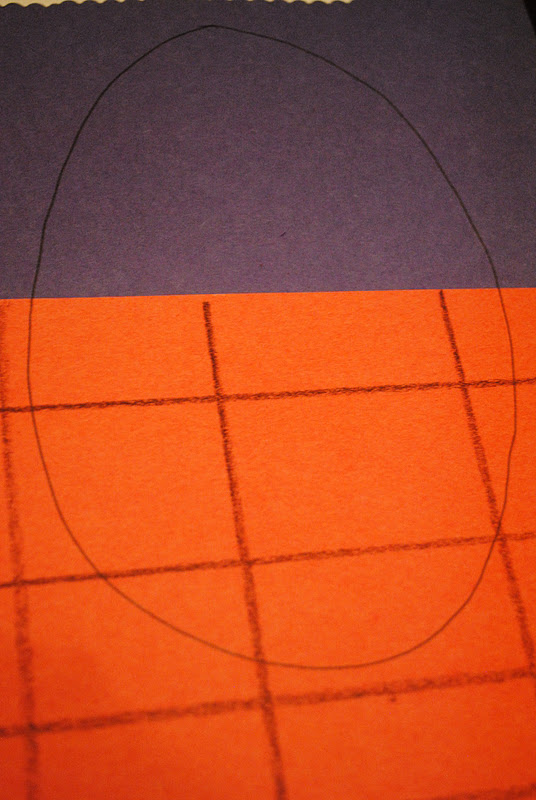

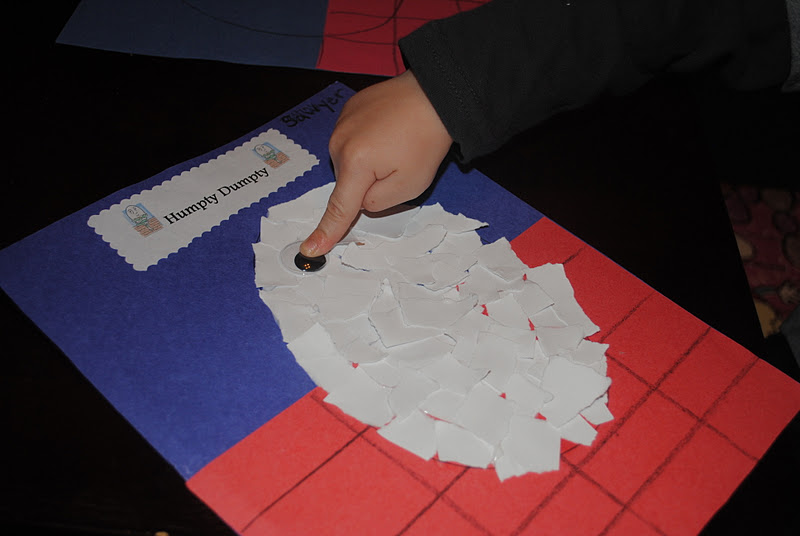
6. Have your child tear small pieces of white paper while they recite the nursery rhyme.  These small pieces will represent the egg shells.  Then ask them to glue the pieces onto the oval shape and put Humpty Dumpty back together again!


7. Sawyer added googly eyes, a nose, a mouth, arms, and legs to the picture.  I also added a little Humpty Dumpty title!


Lesson 2: Jack Be Nimble
Objectives:
* To learn and recite the Jack Be Nimble nursery rhyme
* To recognize the rhyming words in the rhyme
* To act out the nursery rhyme
* To understand the three components needed for a fire to burn (heat, fuel, and air)
* To hypothesize about what will happen when one of these components is taken away

Materials:
* candle and candlestick/stand
* lighter
* clear jar or cup that can fit over the candle


Procedure:
1. Read the Jack Be Nimble rhyme and circle the rhyming words.

2. Place the candle on the ground (NOT lit, of course!) and have your child say and act out the nursery rhyme by jumping over the candlestick.  You can even replace the name Jack with their name to make it more fun!


3. Talk about the three things a fire needs to burn - heat, fuel, and air.  Explain that the heat comes from the lighter, the fuel is the wick/wax from the candle, and the air is surrounding the candle.  This would also be a great time to review fire safety!

4. Light the candle and have your child blow it out.  Explain that when they blow, it takes the heat away from the fire, and it goes out.


5. Now light the candle again and ask your child what they think will happen if you put a jar over the candle and take the air away.  After they have guessed, place the jar over the candle and watch.


6. Explain that by covering up the candle, the air was taken away from the fire, so it went out.  Have them repeat the three things a fire needs to burn - heat, fuel, and air.

Lesson 3: Hickory Dickory Dock
Objectives:
* To learn and recite the Hickory Dickory Dock nursery rhyme
* To recognize the rhyming words in the rhyme
* To create a clock and understand the specific parts - face, hands, numbers
* To learn how to tell time based on the hour

Materials:
* paper plate
* crayons or markers
* black construction paper
* scissors
* brad
* foam numbers (or you can just write them)

Procedure:
1. Read the Hickory Dickory Dock rhyme and circle the rhyming words.

2. Have your child color and decorate a paper plate however they would like.


3. Show them a picture of a clock or an actual clock.  Tell them about the different parts of the clock - the face, the hands, the numbers and dashes that represent minutes and hours.


4. Using the foam numbers, have your child place 12 at the top of the plate and 6 at the bottom directly under 12.  Then add 3 and 9 in the correct spots.  Doing these numbers first will help with spacing of the rest.


5. Let your child check the picture of the clock to see where the rest of the numbers go, then let them place the numbers in the correct order.


6. Now cut the 2 hands of the clock out making sure that one is longer than the other.


7. Using a brad, place the hands of the clock in the center of the plate, making sure the big hand is on top of the little one.


8. Demonstrate how to tell the time (based on hours...definitely not ready for minutes yet at this age!)  Show them how the big hand points to 12 and the little hand points to the hour it is.  Ask them to do some, as well.


Lesson 4: Baa, Baa Black Sheep, Little Bo Peep, and Mary Had a Little Lamb
Objectives:
* To learn and recite the "sheep" nursery rhymes
* To recognize the rhyming words in the rhyme
* To learn about the process of sheep shearing and the products that are made from sheep's wool
* To create a sheep craft using the fine motor skills of cutting, gluing, and taping

Materials:
* Sheep Shearing video
* newspaper or scrap paper
* masking tape
* cotton balls
* black construction paper
* black straws or pipe cleaners
* googly eyes
* scissors
* glue

Procedure:
1. Watch the sheep shearing video and talk about the process of it.  Review the different items that can be made out of wool.


2. Create a sheep craft from Crafty Crafted.  I will let you follow the directions from the site.  So cute!


Lesson 5: One, Two, Buckle My Shoe
Objectives:
* To learn and recite the One, Two, Buckle My Shoe nursery rhyme
* To recognize the rhyming words in the rhyme
* To display specific numbers using your fingers
* To act out the nursery rhyme

Materials:
* a few sticks (we used popsicle sticks)

Procedure:
1. Read the One, Two, Buckle My Shoe rhyme and circle the rhyming words.

2. Have your child act out each part of the rhyme, first by displaying the numbers with their fingers, then doing the action in the rhyme.

* 1, 2, Buckle My Shoe


* 3, 4, Knock On The Door


* 5, 6, Pick Up Sticks


* 7, 8, Lay Them Straight


* 9, 10, A Big Fat Hen! (Sawyer just flapped around like a chicken for this! :))


Extras:

* Row, Row, Row Your Boat - Create a boat and float it in water. Here are directions from Family Fun. We used playdough instead of modeling clay and construction paper for the sail instead of fabric.


* Little Miss Muffet and Itsy Bitsy Spider - Marble painting with black construction paper and white paint to get a spider web effect


* Little Boy Blue - Make a horn craft from Hummingbird Educational Resources. (Scroll down to the Little Boy Blue activities)

* Old Mother Hubbard - Cut out pictures of food and other items from magazines that could fill Old Mother Hubbard's cubbard, and glue them onto construction paper.  You could even add brown construction paper rectangles on top to pretend they are the doors on the cubbard.  (also from Hummingbird Educational Resources)

Tuesday, January 17, 2012

Thinking Theme: Weather

Letter of the Week:  W

Number of the Week:  12

Bible Verse of the Week:  "Sing to the Lord with thanks.  He covers the heavens with clouds. He gives rain to the earth." Psalm 147: 7-8

Books:


Songs: Great weather songs at Perpetual Preschool
________________________________
Lesson 1: Weather Chart
Objectives:
* To understand what weather is and recognize different types of weather
* To recognize and state the weather for a specific day
* To chart/graph weather throughout the week

Materials:
* The possibilities for this are endless.  I have a chart that I used with teaching that you can find at your local teacher store.  Otherwise, you need materials to create your own chart (poster board, construction paper, markers, etc.)  Specifically, you will need multiple cut-outs of different types of weather to put on the chart each day. (sun, cloud, raindrop, snowflake, etc)

Procedure:
1. Create your weather chart (or buy one :) ) making sure there are spaces for each of the 7 days of the week.  This is also a great way to teach your children the names and order of the days.


2. Each day ask your child to look out the window to see what the weather is like.  We sing a little song to go along with it.

What's the Weather? (tune of Clementine)
What's the weather? What's the weather?
What's the weather like today?
Is it rainy? Is it snowy? Are there clouds or is there sun?

3. Have your child place a symbol of the type of weather on the corresponding day on the chart.


4. At the end of the week, look back at the chart to see which weather occurred the most, least, etc.


Lesson 2: God's Promise
Objectives:
* To read the story of Noah and the Ark and discuss the Lord's promise at the end
* To recognize what a rainbow is and the order of the colors in it
* To understand a rainbow forms after a rainstorm

Materials:
* bible or book about Noah and the Ark
* light blue construction paper
* red, orange, yellow, green, blue, and purple tissue paper
* cotton balls
* scissors
* glue
* pencil


Procedure:
1. Read the story of Noah and the Ark and talk about what happens in it.  Ask your child questions about the characters, the plot, and the promise the Lord made to all of us at the end of the story.

2. Draw 6 lines on the blue construction paper with a pencil in a rainbow shape.


3. Cut out small squares of each color tissue paper.


4. Have your child squeeze/fold each square together and glue it on the rainbow in the correct color order.


5. Have your child write (or you help them write) God's Promise at the top of the page so they will never forget what the rainbow symbolizes.  You can add cotton balls to the rainbow to represent clouds if you like!


Lesson 3: Tornadoes
Objectives:
* To understand what a tornado is and how it forms
* To create an art piece using spinning motions like a tornado

Materials:
* 3-4 different colors of paint
* large paper plate
* salad spinner


Procedure: (Our friend EK joined us for this lesson. Sorry some pics are blurry.)

1. Talk about what a tornado is.  I didn't get into much detail because I didn't want to scare the children!  I just said a tornado is a big gust of wind that spins around really fast in circles.  I did the motion for them to demonstrate.

2. Have your child place a paper plate into a salad spinner.


3. Squirt 3-4 different colors of paint onto the plate.  You don't have to use a lot of paint...just about 1-2 tablespoons of each color.


4. Place the lid on the salad spinner and let your child push it as fast as they can to make it spin.


5. Open the lid to see the masterpiece!  This is some of my favorite art work!


Lesson 4: Rain Showers File Folder Game from File Folder Fun
Objectives:
* To understand that certain letters, when placed together, can make a new sound (sh, ch, bl, and pl)
* To match together objects that start with these sounds

Materials:
* file folder
* glue
* scissors
* printables from File Folder Fun


Procedure:
1. Cut out the printables and glue the umbrellas onto the file folder.


2. Explain to your child that some letters can be put together to make a new sound.  Say each sound for your child, asking them to repeat it.  Be sure to point at the letters when you are making the sound.

3. Have your child match the raindrops to the correct umbrellas according to their sounds.


4. You can place the raindrops in a Ziploc bag to save and play throughout the week!


Lesson 5: Wind
Objectives:
* To understand what wind is and recognize that you can feel it but not see it
* To create art work by blowing through a straw to create a wind effect with paint

Materials:
* construction paper
* 3-4 colors of paint
* 3-4 bowls
* cup of water
* spoon
* 3-4 straws


Procedure:
1. Talk about the wind.  Have your child blow on their hand and through a straw onto their hand to understand that you can feel the wind, but it is a type of weather that you cannot see.


2. Put some paint into the bowls and mix each color with a little water to make it more loose.


3. Using a spoon, put some paint onto the paper and let your child blow the paint with a straw.  Allow them to see how the paint moves as they blow.  Talk about how the wind moves things outside.


4. A fun little challenge is to have your child try to blow one color paint into the other.  


* Extension: What can the wind move? from PreKinders

Extra Thinking:
* Cloud Art - PreKinders

* What to wear for the weather? - Put different types of clothing, shoes, and materials in a box that you would need to wear for different types of weather.  Ask your child to put on the correct items according to the type of weather you say.  (Ex: It's rainy outside.  What do you need to wear? Child could put on a raincoat, galoshes, and hold an umbrella.)

* Snowflakes - Orange Marmalade

Saturday, December 31, 2011

A Look Back on December

WOW!!!  What an incredible December this was...definitely my favorite Christmas of all time!  Although it was a little overwhelming at times, I loved every minute of it with my sweet boys!  Sawyer learned so much about the true meaning of Christmas, and even Tucker, in his own little way, saw the light of the world shine brightly!  I was so amazed at how the Lord opened all of our eyes to the needs of His people and to opportunities we have to serve them!  Participating in these RACKS makes me realize how much I need to be doing at other times of the year, not just at Christmastime.  I hope you were able to do some of these activities, as well.  I would love to hear about your experiences!  Maybe you had your own ideas and lessons that you did with your children.  Please comment and share with us!  I know so many people were blessed by your actions of service and love, and, ultimately, our Savior was glorified!!!