As a former Pre-Kindergarten teacher and now stay-at-home mommy of 2 boys and a sweet baby girl, many people ask me how they can be implementing educational concepts in the lives of their young children at home before they enter school. Instead of trying to come up with a quick list of ideas off the top of my head to answer these questions, I have decided to put all of my lessons into this blog. I, along with so many other parents, want to be purposeful at home with my children and make the most of the time I have with them.
I hope that this blog can help, encourage, and inspire you to work with your kiddos and
get involved in the learning process! The benefits will be endless,
and the moments you share together will be priceless! As Dr. Seuss once said,
"The more that you read, the more things you will know.
The more that you learn, the more places you'll go!"

Sunday, March 6, 2011

Thinking Theme: The Five Senses

Letter of the Week: Ff

Number of the Week: 5

Bible Verse of the Week: "Fear not, for I am with you." Isaiah 43:5

Books:


Songs:
* Do Your Ears Hang Low?
* Apples and Bananas
* Five Senses (Tune: "Where is Thumbkin?")
Five senses, five senses
We have them. We have them.
Seeing, hearing, touching,
Tasting and smelling.
There are five. There are five.
* Sound Song (Tune: "Did You Ever See A Lassie?")
Did you ever hear a bell ring,
A bell ring, a bell ring?
Did you ever hear a bell ring?
Ding, dong, ding, dong, ding.
Did you ever hear the wind blow,
The wind blow, the wind blow?
Did you ever hear the wind blow?
Swish, swish, swish, swish, swish.
* The Five Senses Song
_______________________________________
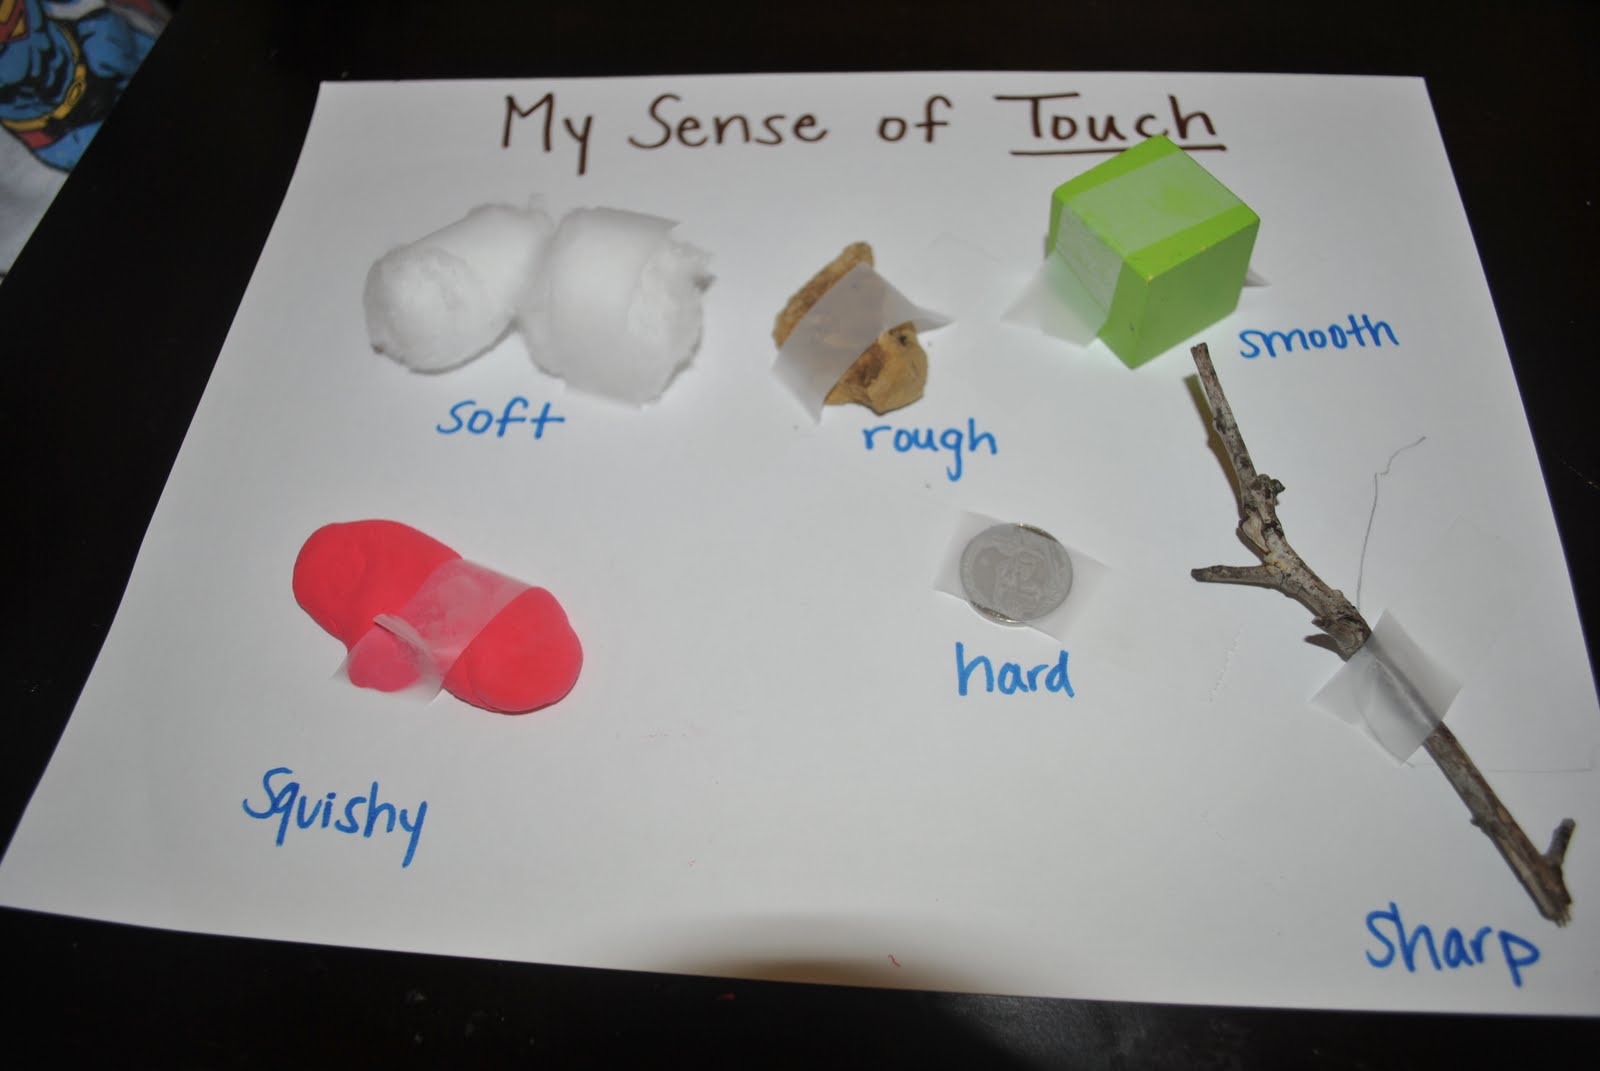
Lesson 1: My Sense of Touch
Objectives:
* To understand what the sense of touch is and how to use it
* To recognize the names of different textures and objects that have those textures
* To use the fine motor skills involved with taping and writing, and of course, touching and feeling!

Materials:
* white construction paper
* child's think tank
* tape
* items around the house that are soft, hard, rough, smooth, squishy, sharp, etc.
(We used a cotton ball, a nickel, a rock, a block, playdough, and a stick)


Procedure:
1. Collect items that have different textures. Have your child touch and feel the objects and name the type of texture it has. (ex: a rock is rough, playdough is squishy, a stick is sharp, etc.)


2. Tape the items to a piece of construction paper and label them with the textures they represent. Write "My Sense of Touch" on the top and hang it on the Think Board so your child can touch/feel these items throughout the week.


Lesson 2: My Sense of Hearing
Objectives:
* To understand what the sense of hearing is and how to use it
* To use your sense of hearing to guess what specific sounds are
* To understand that sounds are different and have specific characteristics (loud, soft, etc.)

Materials:
* computer with Itunes or a CD player with a tape or CD of specific sounds

Procedure:
1. Go to Itunes on your computer and pull up these CDs listed below. You do not have to purchase any songs. A preview of each sound will work perfectly!


2. Have your child listen to the sounds and try to guess what they are. There are animal sounds, sounds from around the house, transportation sounds, etc. This is a fun game for the kids to play!


3. Talk about the types of sounds and how they are different. Ask them how they know it is the sound of a duck or the sound of water running. Help them to realize that they use their sense of hearing everyday to recognize specific things in their environments!

Lesson 3: My Sense of Sight
Objectives:
* To understand what the sense of sight is and how to use it
* To recognize the importance of sight and how difficult it is to move around without it
* To remove the sense of sight and use other senses to find one another

Materials:
* a cloth, bandanna, or small blanket to cover the child's eyes

Procedure:
1. Talk about the sense of sight and it's importance in helping us do our daily activities. Ask your child what they think it would be like to not be able to see. Have them cover their eyes to see what it's like.


2. Next play a little game of hide and seek, but cover your child's eyes so they cannot see. Move around the room to see if they can figure out where you are. Have them use their other senses to find you. Switch and cover your eyes while they hide.


3. Talk about what it was like to not be able to see and how hard it was to find each other without using the sense of sight. Talk about how it was important to use your other senses to help you find the other person.


Lesson 4: My Sense of Smell
Objectives:
* To understand what the sense of smell is and how we use it
* To isolate the sense of smell from the others to guess what different scents are

Materials:
* construction paper
* marker
* items that can be sprayed or rubbed onto paper that have a distinct smell
(we used air freshener, cologne, perfume, and hairspray)


Procedure:
1. Make a circle on a piece of construction paper and have your child spray one of the items into the circle and smell it.


2. Continue this will all of your scents. Label each circle with the correct smell.

3. Have your child close their eyes and smell each scent and guess which one it is.


Lesson 5: My Sense of Taste
Objectives:
* To understand what the sense of taste is and how to use it
* To use the concept of guessing in order to figure out what food you are tasting
* To recognize that we can use specific senses to guess what something is without having to use our other senses

Materials:
* small bowl
* 5-7 different types of snack food that your child eats often - 2 pieces each
(we used goldfish, blueberries, nutter butter crackers, craisins, fruit snacks, grapes, and alphabet cookies)


Procedure:
1. Place food into a small bowl without your child seeing.

2. Tell your child that they are going to use their sense of taste to guess what kind of food is put into their mouth.

3. Have the child close their eyes and open their mouths as you place one food item into it. See if they can guess what it is without looking at it.


He really got into it! :)

4. Once you have finished with all of the food, have your child look into the bowl at the extra pieces to see if their guesses were correct!


Extra Thinking:

* Letter Ff - glue gold"Fish" on the letter F (remember to do upper and lowercase)


* Nature Walk - go on a walk outside around your house or in the park and use your senses to discover different aspects of nature, come back inside and draw a picture of your experience and write about it
* Tasting Apples - buy 3-4 different types of apples and have your child taste each one, talk about how even though they are all apples, they can taste differently, ask your child to choose his/her favorite
* Whistle Game - Play hide and seek using a whistle or just whistle with your mouth. Take turns finding each other using your sense of hearing. (Lots of other extra activities on this site, too!)

Thinking Theme: My Body

This theme is a perfect follow up to "All About Me." We will just be focusing on the parts of the body and how they work. Next week, we will look at the five senses. Have so much fun!

Letter of the Week: Bb

Number of the Week: 2 (If you did this last week because of your child's age, then just repeat it again. We can do it all together this time, and it will go perfectly in talking about the body and the "pairs" of body parts we have.

Bible Verse of the Week: "Be kind to one another." Ephesians 4:32

Books:


Songs:
* Head, Shoulders, Knees, and Toes
* The Hokey Pokey
* Toe Knee Chest Nut
* Father Abraham (motions use different body parts)
* Do Your Ears Hang Low?
* Simon Says Game
________________________________________
Lesson 1: The Bones in my Body
Objectives:
* To understand that there are many bones inside our bodies
* To recognize that these bones connect to one another to hold us together
* To use the fine motor skills involved with cutting, gluing, and drawing

Materials:
* black and white construction paper
* scissors
* glue
* 8 q-tips
* black marker or crayon


Procedure:
(Of course, we cannot make a picture with all of the bones in the body! :) This will just be a fun representation!)
1. Cut out a head shape from white construction paper and glue it on the black construction paper. Then glue 3 q-tips underneath one another going horizontally across the paper like this:


* I also labeled the top of the page with a fun heading "Bones in my Body" with skeleton pics!

2. After this, glue another q-tip on top of the others going vertically like this:


This will represent the ribs in your body.

3. Glue 2 more q-tips on the sides of the "ribs" to represent arm bones.


4. Then 2 more for leg bones.


5. Have your child make a face on the white construction paper, and hang it up on your child's think board!


6. Extensions:
* Talk about the different types of bones in your body, how some are smaller or larger than others, and how strong they are.
* Look at a picture of a skeleton or an actual skeleton to get a better understanding of how many bones we have and how they work together.
* Talk about the names of some of the bones in the body. (mandible, cranium, ulna, radius, etc.)

Lesson 2: My Hands and Feet
Objectives:
* To understand the importance of hands and feet and the functions they have in our bodies
* To use the fine motor skills involved with making hand and feet prints

Materials:
* large white construction paper
* 2-3 colors of paint
* 2-3 paper plates
* something for child to wear to protect clothes from paint


Procedure:
1. Have your child look at their hands and their feet. Talk about what they do and why they are important. Relate this back to lesson #1 from All About Me with the fingerprints.

2. Put a smock or shirt over the child's clothes so they can try not to get paint all over themselves! :) Pour a little paint onto a paper plate and press the child's hand into the paint and then back onto the paper to demonstrate how to make a hand print. Then allow them to explore for themselves. You can use multiple colors like we did if you want to.


3. Repeat step #2 with their feet. This is a messy lesson, but so much fun! You will have beautiful artwork to display, as well!

Lesson 3: My Whole Body
Objectives:
* To create a lifesize replication of the child's body and recognize that this is their actual size and what their body looks like
* To recognize and label the different parts of the body and participate in the Langauge Experience Approach (explained below)
* To use the fine motor skills involved with coloring, tracing, and writing

Materials:
* large piece of butcher paper or multiple pieces of construction paper taped together
* pencil
* markers or crayons


Procedure:
1. Have your child lay down on the piece of paper as shown below and trace their body onto the paper. Be sure that they spread out their arms, hands, and legs so you can trace around them.


2. After the tracing, allow your child to color the picture of their body. Talk about the color of their hair and eyes, color of their skin, etc. Add any kind of detail you want to the picture.

3. Label the specific parts of the body. Have the child tell you what each part is and then write it for them or have them write it if they can. If you are writing it, make sure the child is watching you and watching the letters you are writing. Say the word as you write it. This is called the "Language Experience Approach" and helps with early reading and writing skills.


*Save your picture for another lesson later in the week!

Lesson 4: My Healthy Body
Objectives:
* To understand the importance of being active through exercise, movement, and sports and how these activities keep our bodies healthy
* To use the motor skills involved with exercise, movement, and sports

* This activity is up to you! Choose any kind of activity that will allow your child to get up and get moving! Some examples are swimming, playing chase, hopscotch, kicking a soccer ball back and forth, jumping rope, etc. For this lesson, we played basketball and baseball with grandpa!

Materials:
* Whatever you need for your specific activity. We used a ball and a goal.

Procedure:
1. My dad is a coach, so he was the perfect teacher for this lesson. He played catch with Sawyer with a soft baseball, showing him the correct way to throw the ball and catch it. He also made Sawyer throw with his left hand and then his right hand which helped Sawyer differentiate between the two.


2. Then they played basketball, taking turns with shooting.


Sawyer loves to run up and dunk it!

* This is a great way to get your kiddos into exercise, sports, or any activity that will get them moving! It is so important for our bodies!

Lesson 5: My Measurements
Objectives:
* To understand what measurement is and how to measure something using a measuring tape or a ruler
* To determine the measurements in inches of different body parts
* To recognize specific numbers on the measuring device
* To use the fine motor skills involved with holding a tape measure/ruler and making a measurement, as well as writing

Materials:
* paper from lesson #3
* child's think tank
* measuring tape or ruler


Procedure:
1. Explain to your child what measurement is (how long or big or heavy something is). Demonstrate on your own body how to take a measurement of your arm. Show them the numbers and explain that the number that reaches the end of your arm is how long your arm is. Allow them to explore.


2. Measure your childs arms, legs, hands, feet, waist, head, and whole body, and write down the numbers on the paper. You can guide your child's hand in writing these numbers or have them write it themselves.


3. Extensions:
* Talk about how these measurements will change as they grow. Ask the child, "Will the numbers get bigger or smaller? Will you grow taller or shorter?"
* You can make or purchase a growth chart to keep track of their measurements throughout the years.

Extra Thinking:
* Letter B - Glue teddy graham "Bears" on the letter B (remember to do upper and lowercase) Your child can also color on the page with brown, blue, and black crayons.


Yummy!


* Body Part Science (#1 lesson on page, extension to lesson #3 and #5)
* Bean Bag Body Parts